Showing posts with label Banners. Show all posts

U & Papa

Thursday, October 9, 2014

Hiya! At this point, I'm nearly done with my crazy busy work trip. 7 nights in 5 cities, it's a lot of movement! I love it, it makes things interesting. It also means I have a decent amount of quiet time as I'm sitting on a plane or a train. And of course, it means I'm not sitting in the same meeting room for days on end. Hopefully I'm updating my instagram (I made sure all of my hotels had free wifi!) and you're seeing some fun pictures. 

So enough of my chatting at you from the past, let's talk about the present. I'm sharing one of my latest Scrapbook Circle kit pages. This was made with On this Day, a kit chalk full of goodness…and specifically some great oranges. Arguably, orange may be my 2nd favorite color after yellow. It's just so robust! 

The kit had a ton of it, so Tessa challenged me and Valerie to incorporate orange into our pages. Here's Valerie's take on it. I love those leaves!!! And below is my layout using orange.
I paired it with blue. Lots of different shades of blue, teals and baby blue and even some denim. The colors just worked so perfectly with these cute photos of my brother and my nephew. There wasn't any great or meaningful story behind these, just the two of them together. And that was enough for me!
I went with a banner look and adhered everything along an invisible line, 1/3 of the way down the page. It meant grabbing printed die cuts and paper scraps, stickers and chipboard. And of course I couldn't resist the cork piece! This is one of my favorite designs because it means I can incorporate lots of little odds and ends.
Tessa blogged more about this on the Scrapbook Circle blog. Hop on over there to read a bit more.

cheers & besos,


Family Everyday

Tuesday, October 7, 2014

I made this page back in August, but am only just now getting around to sharing it with you!! It was one of the 5 pages I did in the morning before Lauren's birthday party (see the rest of them here).
We did a potluck for friend's Christmas last year and I got to snap photos of everyone. These were absolutely some of my favorites. The lighting was perfect, the subjects were cute, their clothes were fun colors. Sigh…yes everything just jelled. To highlight the series, I made a quick photo collage in PSE.
The embellishing ended up being super simple. Just a banner across, cut with my Papertrey Ink banner builder dies, some twine, a die cut and some Thickers. Viola!

cheers & besos,

Stash Bash V.3

Sunday, March 16, 2014

Good morning! Happy Sunday =) I cranked out two more layouts last night using the Simple Scrapper Stash Bash prompts. Here's one using an older sketch from the member archive (Dec 12 for my fellow Simple Scrappers).
I finally got to use my American Crafts Triangle Punch and another of Wilna's die cut phrases. I pulled colors from the photo, which made for some odd pairings. But I like it. The journaling is throwing me off a bit but I'll deal.
cheers & besos,

First Video

Sunday, May 12, 2013


My first video! I did it! And it was fun =) Not easy but still fun. Bear with me guys, this was my first ever video. I was having to learn iMovie this morning as I went along. But luckily it's pretty straight forward. And as I say in the video, apologies for the shaky cam! I'll work on it for next time.


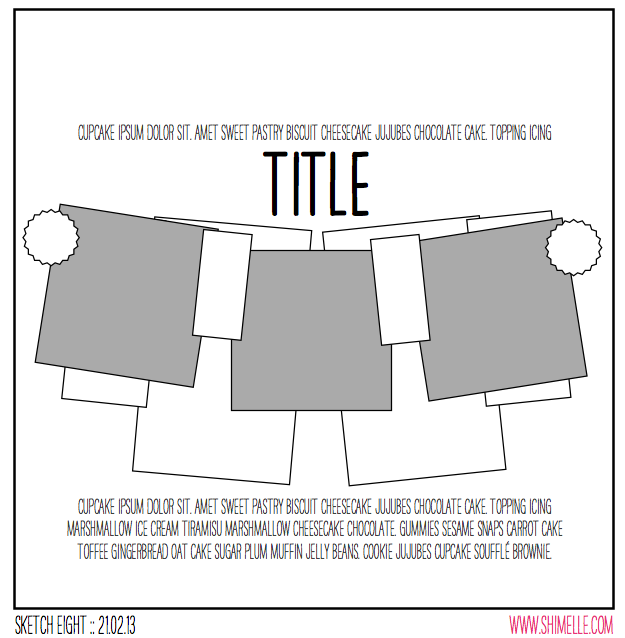
Here's the Shimelle sketch I based my page off of:


...and some close-ups of the finished layout! 


Let me know what you think!

cheers & besos,

LBD: Fairytale

Sunday, April 7, 2013


[Sigh] I just adored the dreamy quality to this fabulous sheet of Crate Paper that came in this month's Little Black Dress Kit. It has such a lovely ethereal feel to it. I initially wasn't sure how I wanted to use it so I set it aside and let it marinate in my brain. Then the one day I was sick (and didn't fall asleep until 7am!) I started to day (again it was night time & I couldn't fall asleep!!!) dream about what my fairytale wedding would be. I've talked about it with my besties before, but thought this paper would make the perfect background for a page about my dream/fairytale wedding.

I channeled my inner Wilna for this romantic page. I didn't actually lift any of her pages. But really just thought about her style and how she might have approached this page. Its probably an amalgamation of a lot of her pages really.

I started by playing around with my photos in RadLab. I wanted them to have a faded dream like quality to them, similar to the background paper. The colors went perfectly with the paper IMO! They're images from a trip I took to Sintra in Portugal. This tiny city was one of the most amazing places I've ever visited. They are literally storybook castles on top of mountains!!


Sintra really is a place out of a fairytale. If ever you're in that part of the world. I 150% recommend you should visit =) But anyway back to the page.

I started by adding drops of Heidi Swapp color shine in Primrose and Tropicana Teal. Then I went to town with my punches and used that fabulous pink ombre from Dear Lizzy to get a crop of different colored butterflies. I also used it for my title. Thanks again trusty Silhouette!

I fussy cut a few flowers out of a sheet of patterned paper and then also punched a few birds and hearts out of different cardstock to fill in the gaps.  There's a great birthday patterned paper in the kit with music notes and a song that says "It's your special day we want to celebrate". Too perfect for a wedding inspired page, no?! I cut it like a banner and used it to back my title.

Non-kit supplies used: Heidi Swapp Color Shine, pink cardstock, bird punch, heart punch, butterfly punches, Silhouette Cameo.

cheers & besos,


NYC in November

Sunday, January 13, 2013

I scrapped! I scrapped! I spent my entire Saturday holed up in my room, gloriously cutting paper and pasting photos. This was the first chance I've had to just play. Not make a present or card. Just having fun working on my own stuff. 

I'm watching the Golden Globes so this is gonna be brief but I wanted to share a few pages of my November in NYC. Well really it was a weekend ;) but a long one! 

I also made a play at some of the 2Ps CHA challenges. This was for the 5 photo challenge and I was directly inspired by Glitter Girl's post this week. I used my Studio Calico Block Party kit, my last kit for the year (which I purchased in 2012 mind you!). 

This page also works for a few of the Studio Calico Challenges, like Use Multiples of the Same Embellishment, More than 3 Patterned Papers, and create a 2 Page Layout


This next page is for 2Peas Challenge No. 6. I used 6 wood veneer banner pieces to finish off the page. It's also good for the Use Multiples of the Same EmbellishmentMore than 3 Patterned Papers, and Dress Up your Veneer Studio Calico challenges.

It's been awhile since I've made a page totally from my stash. I went to my paper bin, picked what I thought worked best, grabbed a set of Thickers and some embellishments and just played! Look for more pages like this, I'm scrapping my stash!


And that's all folks. Thanks for dropping by. I'll update later this week with more CHA challenge projects.

Back to Golden Globes watching I go.  Yay Lena!! Amy & Tina F, my girl crushes on you have just got bigger.

cheers & besos,

Mother/Daughter

Saturday, October 20, 2012

I'm back! Sorry about the brief hiatus. I wish I could be blogging and scrapbooking at my regular pace. But alas, I'm studying to sit for the Project Management Professional (PMP) exam. Needless to say, that's eating up a lot of my time.

But here's a page I made today! 

Earlier this week, I spent an evening with my Roller Rink kit, pairing photos with possible papers and products. I didn't have time to do anything with them, but it made me feel creative to just do that. It was a temporary hit of a much needed scrapbooking high! =)

This black and white photo of me and my Mama was a rejected photo for her birthday card and I thought it went so beautifully with the blue patterned paper. This was my favorite sheet from this month's kit and I'm so glad I got to feature it in a big way on this page. 

And also that I got to scrapbook!! I spent hours studying today and by 5 pm I was done. I rewarded myself with a bit of scrap therapy.


The design is based on a sketch from Scrapbook Trends' submission page. But I played around with the elements just a bit.

As a nod to the stripe at the top and bottom of the sketch, I thought it'd mix it up and have the entire design hang off the side of a plain sheet of cardstock. I love this look and will totally be using it again and again. Also think I was subtly influenced by the lovely Steph on this one =)

[PHOTO]

The sketch called for a banner and I wanted it to have a bit more texture to it. So I cut a whole mess of pennants, outlined them white pen and inked the edges with Tin Can chalk ink. I strung them up on a piece of yarn (not included in the kit) and had them overlap each other.

I decorated the "open air" with Amy Tan puffy stickers and punched vellum clouds. I also punched two tiny birdies out of the backside of the second blue vellum envelope (from the Crack the Whip add-on). I can't even begin to describe how gorgeous that shade of teal/steel gray blue is in real life! The photos don't do it justice.

[PHOTO]

I loved the wood veneer chevrons in the kit but they were too brown for the page. So I dressed them up with some Martha Stewart Glitter Paint in silver. The same paint I used on the inside of my December album last year.

The quote in the sticker was the perfect touch, since glitter was mentioned. Also because I'm looking straight at the camera and you get to see my big semi-Asian eyes, another gift from my mother.

[PHOTO]

Journaling Reads:

"My parents grew up in a different era. They met young, married you and started having babies young. My Mama was only 21 when I was born. She always says she grew up along with me. But as a kid you never notice such things. She was just my Mama, someone I looked up to. Literally! As an adult, I can appreciate all of the sacrifice that went into being a young Mama and I'm sure there were opportunities she may have had to let pass. I'm eternally grateful for her love & her sacrifice. I firmly believe her selflessness helped pave the way for some of my opportunities. I still (metaphorically) look up to my Mama. There's a lot of amazing in her tiny frame."

Can I say that I'm in love with this page? I love the soft colors and all of the little elements. It's not my usually style but I think it's why I like it!

I wanted it to be soft and a bit dreamy and the color helped enforce that. Which was the topic for this week's Glitter Girl video. I totally choose colors based on my photos. I think it's one of my scrapbooking strengths!

Ok, I think I'll end it there. I was a bit wordy today, apologies. I think it's because I've been blog deprived this week! I have a few more projects to share. But be forewarned I'll be around more scantily than usual. Counting down the days until November 11th!!

cheers & besos,

3x5x30

Saturday, October 13, 2012

Sharing 3 cards made in 5 minutes and blogged within 30 minutes. This is live people! =)

I'm short for time these days. Between work travel, work, the new mentoring program I'm starting at work, being sick and now studying for my PMP exam, the days...well they aren't getting any longer.

Yet, somehow I still have time to kill hours on the internet :P Which is how I came across Ellie's 5 Minute Card Challenge.

Knowing I needed to make something, I've been itching to do it! And knowing I needed to update the good old blog. I figured I could squeeze in a 30 min activity. 


I grabbed 3 card blanks and my Roller Rink Card Kit. I quickly gravitated to the printed vellum speech bubbles. I paired them all up and went through the paper pad to find coordinating colors.


Loved the green, red and gray together! So I tore 'em out and ran them through my Big Shot using the Papertrey Ink banner builder dies.

For dimension, I added either a Amy Tan sticker or an MME enamel dot. Then, I snipped a piece of twine (not included in the kit) for each card and tied knots on both ends. Glued them to the top of the banner and finished with a sprinkling of Mister Huey in Clay.


I wanted to play with both rounded and straight edges, since the speech bubbles reflect both those designs so well. Corner rounding the one edge was the last step.

And done!! 3 cards, made in 5 minutes (or thereabouts) and blogged within 30.

Deep breaths....and now I head off to study. Happy Saturday!

cheers & besos,

BOYS Challenge Layouts

Monday, September 10, 2012

I've been stash busting lately and man does it feel good. The Blow out your Stash (BOYS) Challenges over on the Studio Calico message board are what's getting me through. They even helped me finish up my Japan pages.


This is for Challenge No. 6, the recipe one. I used brads, ribbons and twine, a stamped skyline (a new Kelly Purkey), letter stickers and asterisk cardboard thickers. Those asterisks were the best find, they're basically open triangles all pointing to the middle. It reminded me of the cross walk and all of the streets coming together at this one crossing.


Color color color!! This is for Challenge No. 4, the color one obviously. I cannot think of a better use of Amy Tangerine paper than for a layout about the Hirajuku district in Japan. It's definitely colorful. So happy I got to use these awesome products. They've been sitting around collecting dust!


I've been a Studio Calico subscriber off and on for 2 years now. Brooklyn Flea was one of the kits I missed out on when I cancelled my subscription. But lucky for me, the kit didn't sell out and was available for a deep discount at one of the Last Call sales. Hence, it was as yet unused.

For Challenge No. 1, I decided to get it out and cut into it. And as part of the challenge, I decided to lift a layout from Ali Edward's gallery. Her, You are so You, to be specific. I loved the look of those tags.


Finally, I tackled Challenge No. 2. I hand stitched and played with ribbon, trim, twine and fabric, all in one go!

I've always been a fan of challenges. They push to step away from my comfort zones and I always end up loving the results. Mainly because they're usually so different from my norm. What about you, do you use challenges for inspiration?

And, if you're in the market for some other fun challenges, please check out my 4 Challenges post. Two winners will each get a $10 gift voucher. Free money, new pages to add to your album or a new card to send to a friend, what's not to love?

cheers & besos,

Tokyo Takeout

Saturday, September 8, 2012

Japan! It's done. In the can. All scrapbooked and in my album complete. But it's going to take me a bit to share the rest of the pages. 

I'm a planner you see. I devised a whole blog plan for September. Introducing a few new series posts, issuing challenges, hosting a blog hop later this month, and launching a bit of a venture in a few weeks time. All of which be leading up to my 400th post!

Be sure to keep checking back for all the fun and surprises I have in store for my little corner of the interweb.

Now on to the pages!

I made a quick 8 1/2 x 11 page featuring all of my snapshots from Asakusa, a traditional pagoda in Tokyo. I tried to find the best configuration to include all of these shots on one page, and lining them down one side of the layout was the best way to go. Matt pointed out that it was vaguely reminiscent of the eaves from the pagoda. Which of course I totally meant to do ;)


Don't adjust your screen folks, the photos are really that blue! It was a blue and starry night, that night in Tokyo. And hanging out on the blue deck of the Tokyo Tower only added to it.

I made this page with Studio Calico's Hey Day. I snapped up the whole collection very cheaply from Stop and Scrap a few weeks back. I liked how blue the photos looked, contrasted with the yellow. It's a little out there but I'm ok with that.

Happy Saturday folks!! 

cheers & besos,

Zushi Beach

Saturday, August 25, 2012

Japan, I have to say, is well on its way to being fully scrapped (no jinx!!). And that my friends, makes me very happy. It will undoubtedly be the first time that's ever happened.

I'm using every trick in the bag to keep up my momentum for this project and those photos. 

Like for this page, I used a sketch. This week's Studio Calico Sunday sketch to be exact.


My second day in Zushi, Sarah took me to the beach where she works. We hung out at Thomas' Bar, I got to meet some of her co-workers/friends, drink fun new drinks, eat crazy strawberry milk flavored slushy things and just relax! It was perfection.


If you can believe it, I used the Summer of 69 kit and stuck fairly close to just using it's contents. I always try my hardest to use the kit and only the kit. But, I figure mist, paint, stamp ink, sewing thread, etc. are all freebie items that can go with any kit. So that's how I managed to incorporate the purple these photos needed!

I sprayed some Purple Maya Mist (sadly Mister Huey doesn't come in any purple hues!) and hand stitched part of my title using embroidery floss. It seems I channeled 2 lovely scrapbookers in this page: Maggie Holmes who's layout is the basis of the sketch, and Amy Tangerine!


Are you ready for more Japan photos? I'm not quite done but definitely on my way there!

cheers & besos,

Bookmarked

Tuesday, August 7, 2012

I've been getting inspired lately! And most of my inspiration has been coming from my Craft Inspiration pinterest board. I collect all kinds of things here: good design, quotes, color combos. 

This week, I decided to share some projects inspired by my Pins.

For my first project, I picked this pin for inspiration. I love the design, the colors, the quote of this print (at least I think it's a print). And for my scrapbook page, I used the design and the colors as jumping off points. The quote I'll keep tucked away for another page.

(Pin)

This is the resulting page. And btw, I love it!!

My circle punch attacked some patterned paper scraps and with some adhesive and ruler-ing (yup, made it up) I had my own custom background.


I used the reading stamp set from an old Studio Calico release, one that I bought because I liked it but then had no idea when/what I would actually use it for. I've been pleasantly surprised by the number of times these stamps have made their way onto my pages.


I also used an Oromulu badge and some thickers for the title.


And then tucked in a bit of ribbon to replicate the bookmark. To finish, I layered an inked wood veneer heart over a stamp to give it more dimension.


Oh, and in case you're wondering where the journaling is, I hid it behind the photo. Usually, I have the photo flip up to reveal the journaling, this time I had it open like a book.

Journaling Reads:

I love to read, & so does my mother. When I was little, we’d just lay in bed reading our books together. It was one of my favorite ways to spend time with her.

We don't necessarily like to read the same books. Only sometimes do our tastes overlap, & I’ll suggest a book she should read – like The Grapes of Wrath but only every other chapter. Or she’ll send me something I might enjoy, like Honolulu
by Alan Brennert.

The other day I was sitting on the bus on my way to work, reading that book she had sent, when I flipped the page & found her bookmark. It was a photo I had e-mailed her, two baby elephants with their trunks wrapped around each other. I sent it & told her it was us.

I love that photo. And it warms my heart to picture her printing it out & using it as her bookmark. But the magical thing about it was that the photo of “us” made it’s way back to me. Finding it in that book made me feel so connected to my Mama.

Our love for books still brings us together, even though we live far apart.

cheers & besos,