
Hey yall!
Happy Sunday...or whatever day you might be stopping by to read this post.
About to go into details about this lil teaser I posted last week :)
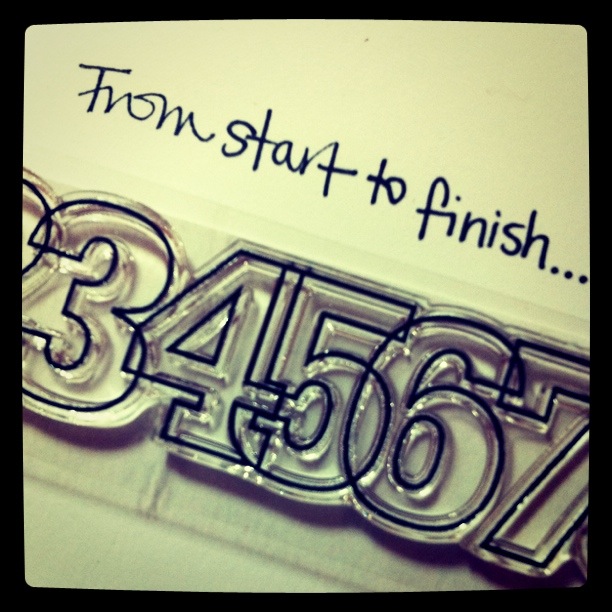 So I had this idea to share a layout with you all, and to go into detail about how it came to be, the design choices I made, etc. etc. All that weird abstract stuff that goes into making a page, from start to finish.
And it's funny that I thought to do this, because not even a day later, I listened to one of the Paperclipping Roundtable episodes (#063) which was going over the exact same thing! (I'm a bit behind on these.)
 Here are one set of steps I take to make a page! (For pages when I have a more abstract idea, as opposed to a themed or event page.)
 Here are one set of steps I take to make a page! (For pages when I have a more abstract idea, as opposed to a themed or event page.)
If for some reason you can't view the picture, they are:
- The idea aka conception
- Picking photos
- Choosing colors
- Design & placement
- Gluing
- Embellishing
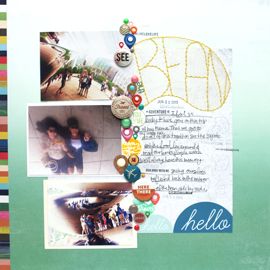
 I. Conception
So here we go! This was where my idea come from. My newly re-organized scrap space. My desk sits right under this floating shelf and curtain rod. I lined up all of my mists and embossing powders, and hung up some of my newest stamps sets and all of my tape. For one, a better flow and two, some inspiration.
And that was all it took!
You see, my scrapbook area is in my room. My bed is right next to it, so every morning I roll over and this is the first thing that I see. I get to look at all the pretty colors and all of my fun stamps and am just inspired by the products themselves.
What particularly stuck out to me this time, was the numbers stamp that came with my May Studio Calico kit. I love how they all overlapped and it got me thinking about my family.
Or any family really. How a family starts out with 2 people and then expands to encompass more and more, everyone's lives intertwining and overlapping with each others.

So I had this idea to feature a string of photos, showing the expansion of my family. A photo of my mom and dad, then one of the three of us after they'd become parents, and then when my little brother came a long and we were a family of 4. And then how we grew up and our family has expanded to include Urijah and Matt. This whole idea spiraled from that one stamp!
I had to dig through my box of baby pictures, to find the older ones. And then beg my mom to go find that one family photo of us from way back when. Which btw, is the only professional photo we've ever taken as a family. And! one of the very few photos we have of the 4 of us.
Sad, I know!

III. Color
Once I had my photos, I knew I was going to convert them to black and white. Because there were so many conflicting colors and because they were over a span of 20 years, I wanted them to have a more cohesive look.
After that I knew the sky would be the limit on the colors I choose!
Initially, I opted for a bright color scheme and used a spritz of my Mister Huey's to paint in the numbers. But I didn't like how the colors turned out like that. I figured I'd come back to that later and then turned to my "background paper".

I've also been itching to use this great bubble stamp and some of my new Zing! embossing powders, so I went to town with some colors.
But...I didn't turn out quite like I wanted to. So I decided not to use it.

It was about this point that I drew some inspiration from a sheet of Studio Calico patterned paper. This sheet has always made me think of a nuclear symbol or the hexagon. It's the product of working in energy! But since I've just googled it, I think I was thinking of a nano grid! Let's just pretend I was right ;)
So with me thinking of these as "nuclear" symbols, it was about that time I decided on the title of "Nuclear Family".
Which wikipedia defines as, "a family group consisting of a father and mother and their children, who share living quarters."
Even though we don't live together anymore, I think the concept still works.
IV. Design & Placement
Then I made a little sketchy sketch, of where I thought everything would go. I made room for a numbered border, 5 five photos, and some lines of text.
 Since I had so many photos, I tried to make a 12x12 work. Because I had to print the photos so small.
But then the scale was off. It was something like 2/5 to 3/5 unused space. So I opted to cut it down to 8 1/2 x 11.
And from there I just followed the sketch!
V. Gluing
I glued!
 This was the final result :) 5 photos, 8 1/2 x 11 format, green/teal/light blue/mustard yellow color scheme, and a few lines of text.
 Like in my initial idea, I started out with a photo of Mama & Papa. I think it was taken before I was even born. I'm not sure why Papi was all dressed up. I'll have to ask my Mom.
 This was the final result :) 5 photos, 8 1/2 x 11 format, green/teal/light blue/mustard yellow color scheme, and a few lines of text.
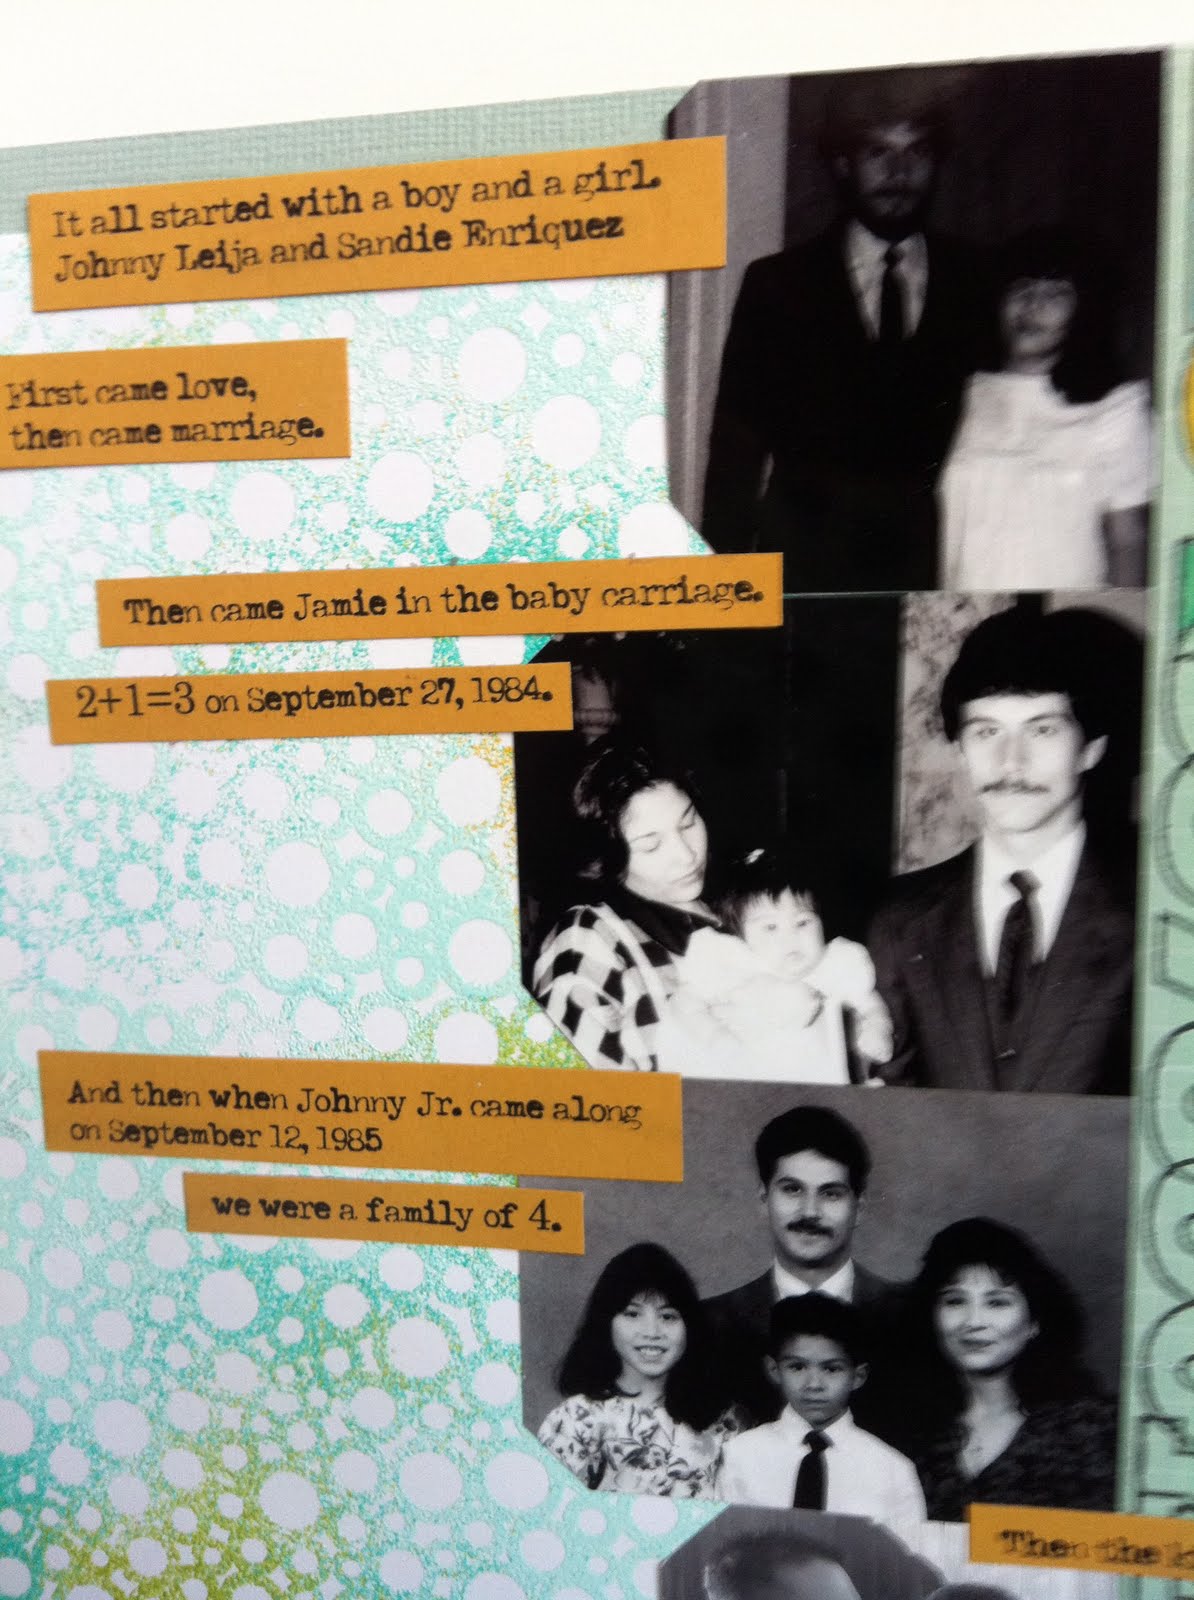 Like in my initial idea, I started out with a photo of Mama & Papa. I think it was taken before I was even born. I'm not sure why Papi was all dressed up. I'll have to ask my Mom.
Journaling Reads:
It all started with a boy and a girl.
Johnny Leija & Sandie Enriquez
First came love,
then came marriage.
Next was probably the only photo of the three of us ever taken, before my little brother came along. It was at my baptism in February of 1985.
Journaling Reads:
Then came Jamie in the baby carriage.
2+1=3 on September 27, 1984.
 Then there's that photo of the 4 of us, the only professional one we ever took. Look at that helmet of hair I was rocking!
Journaling Reads:
And then when Johnny Jr. came along on September 12, 1985
We were a family of 4.
And then a photo of my brother and I all grown up, followed by a photo of Urijah, his son.
What I love about the two photos side by side, is that they're both looking off to the side of the camera. And perhaps symbolically, my brother's looking to the past and my nephew into the future. Plus, I love seeing photos of them side by side and getting to see how similar they look.
Journaling Reads:
Then we grew up.
Urijah was born April 20, 2009
and made our family 5.
 Here's what started it all.
That stamp.
Painted in with the colors overlapping.
 And finally, a photo of me and Matt. My new family :)
Journaling Reads:
And somewhere along the way
Matt joined the family too (#6).
 VI. Embellishing
There really isn't too much to my embellishing on this, mainly because the paper was taking center stage. I cut out one of the hexagon's and added some yellow letter stickers, and it was as simple as that.
So there you have my nuclear family, and the journey it took to get to that finished page.
Thank you to anyone who took the time to read this far! I appreciate you :)
Please let me know if this is something that you might be interested in me doing again!
xxbesos


Wow Jamie! Love what you did with the bubble stamp and embossing! Did you just randomly start pouring out colors?
ReplyDeleteSTUNNING page. i adore this whole post. i'm in awe over both versions of the bubble stamp. love every bit of it!!
ReplyDelete